After using the Tetsu 4-6 recipe daily for almost a year, I started wondering how it compares against popular alternatives. The best way to find out would be to try it out myself.
Coffee
In the past, whenever I wanted to run coffee experiments, I’d rely on my baseline coffee from Mt Whitney Coffee Roasters. Since I’ve recently upgraded our baseline beans, the guinea pig for this fun exercise will be the Ethiopia Yirgacheffe Aramo from Jewel Coffee instead.
Criteria
As I brewed my coffee using the different recipes, I evaluated them on a scale of 1 to 5 using five criteria. Two of the criteria (flexibility, ease) focused on technique, and the remaining three (body, flavour, clarity) were related to taste.
| Description | |
|---|---|
| Flexibility | Tweakability of recipe |
| Ease | Simplicity of pour |
| Body | Strength and mouthfeel |
| Flavour | Overall yumminess |
| Clarity | Brightness and acidity |
Tetsu 4-6 Sweet x Strong
Since I’ve already covered the Tetsu 4-6 recipe in detail, I won’t go too much into it. But here’s a YouTube video demonstration by Tetsu Kasuya himself. Among the different possible variations, I rely on “Sweet x Strong” most frequently, and used it to compare with the other recipes.
My brewing parameters were:
- Coffee: 25gm
- Water: 400gm (1:16 ratio)
- Grind Size: 3-5-2 (1Zpresso JX-Pro)
- Water Temp: 94°C
- Bloom: 50gm (2x coffee)
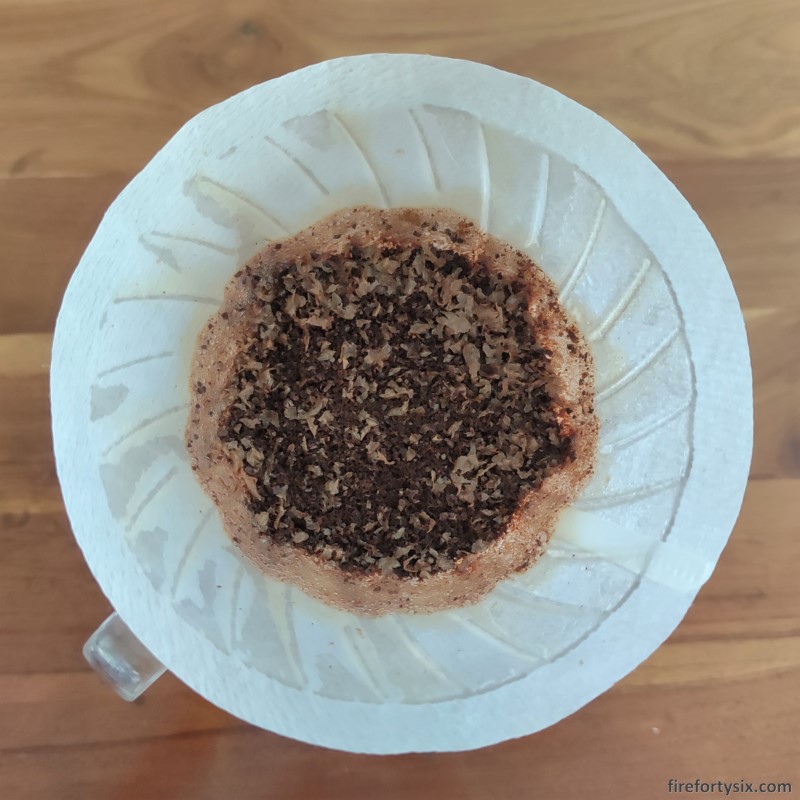
The coffee bed after brewing was quite flat. Given the multiple pulse pours, the water level doesn’t really rise too high. As a result, any fines present on the outer edge are caught on the lower portion of the filter wall.
When I first started using the Tetsu 4-6, it took me a couple of weeks to get comfortable with it. It’s not the easiest recipe to execute consistently, but it does provide a lot of flexibility in tweaking the sweetness and strength of our brew.
The “Sweet x Strong” variant results in a full-flavoured cup with a strong body and moderate clarity. At the other end of the spectrum, “Bright x Light” emphasises clarity over body, but it’s not the type of coffee we enjoy so I hardly use it.
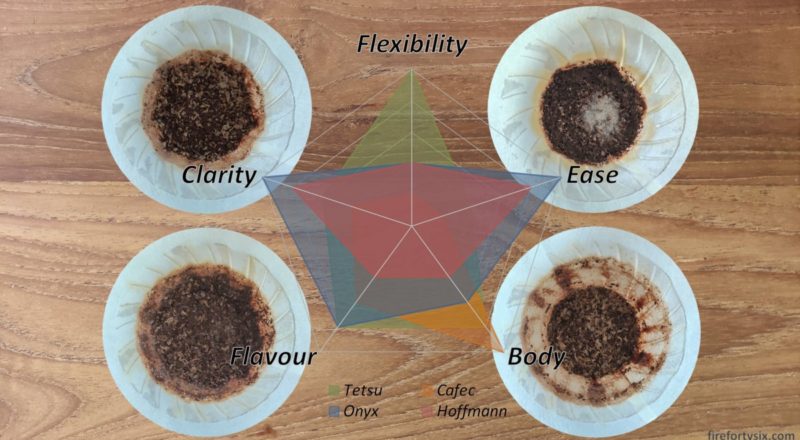
A good way of visualising the differences is a radar plot with five axes, like the one below. I used the same type of plot to record my findings for each of the four recipes. To aid visual comparison across all four recipes, I then overlaid all of them onto one chart.

Cafec Osmotic Flow
Cafec’s YouTube video demonstrating their osmotic flow recipe is short on details like grind size, bloom amount, water temperature, coffee-to-water ratio. So for simplicity, I used the same parameters as my Tetsu 4-6 brew.
I’ve summarised the key points of the technique, for future reference. Water weights are based on a coffee dosage of 25gm and coffee-to-water ratio of 1:16.
[Start]Bloom 2x(50gm)slowly in circular motion, from centre to outer edge[At 0:45]Slow centre pour until bubble forms, then stop- Wait for bubble to subside, and then centre pour again
- Repeat until 1/3 of total water reached
(133gm) - Start slow continuous and tight circle pour around bubble
- Try to maintain bubble throughout the continuous pour
- When close to 100% water reached
(400gm), expand circle and finish
On their website, Cafec goes into quite a bit of detail on their osmotic flow theory and how “coffee essence” (i.e. the good stuff) is extracted by creating and maintaining different water concentrations. Sounds plausible, I guess.
I’m not exaggerating when I say that this recipe was crazy hard to execute. I didn’t succeed in creating that nice round dome and maintaining that big beautiful bubble. Despite multiple tries, I didn’t even come close.
Based on the video, the beans were quite dark and probably recently roasted. That’s the only way I can explain the copious amount of gas coming out as the water was poured.
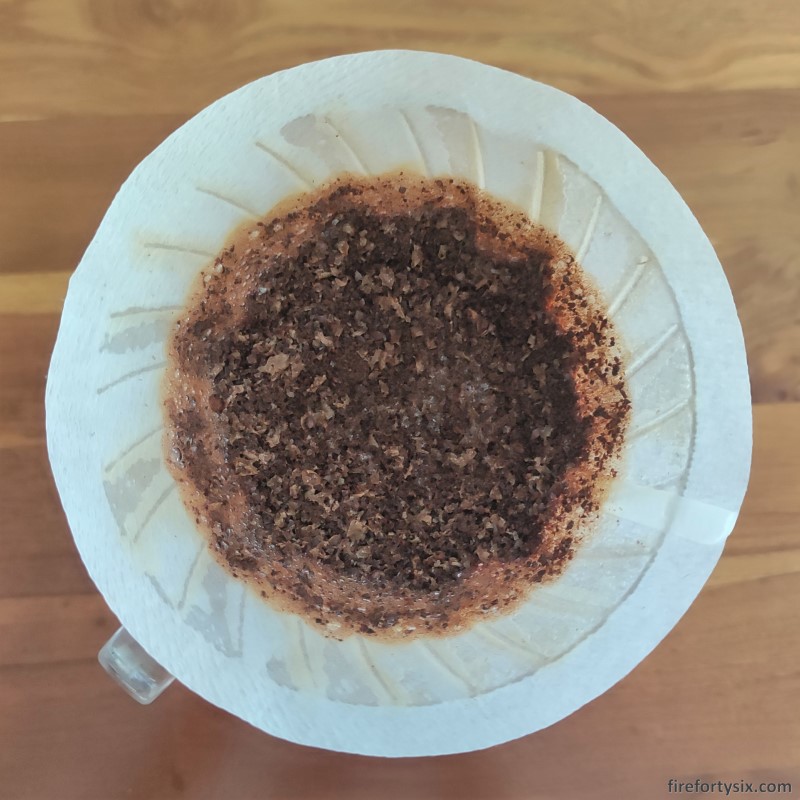
Since my beans were medium-roasted and rested for three weeks, it was unlikely for me to replicate the video. Looking at my brew bed below, you can still make out the small patch of remnant bubbles on a slightly-domed coffee bed.
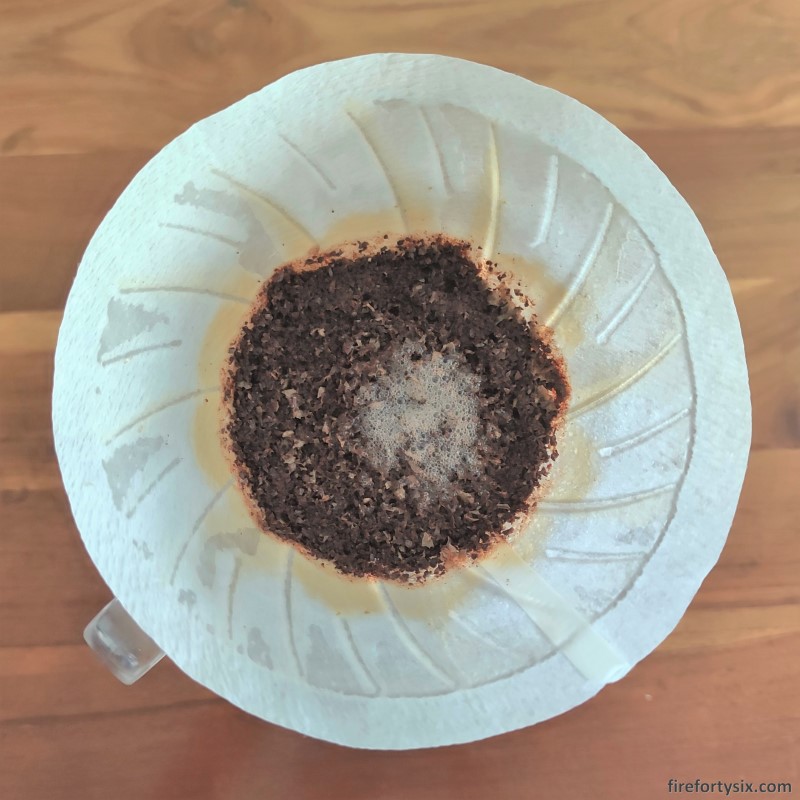
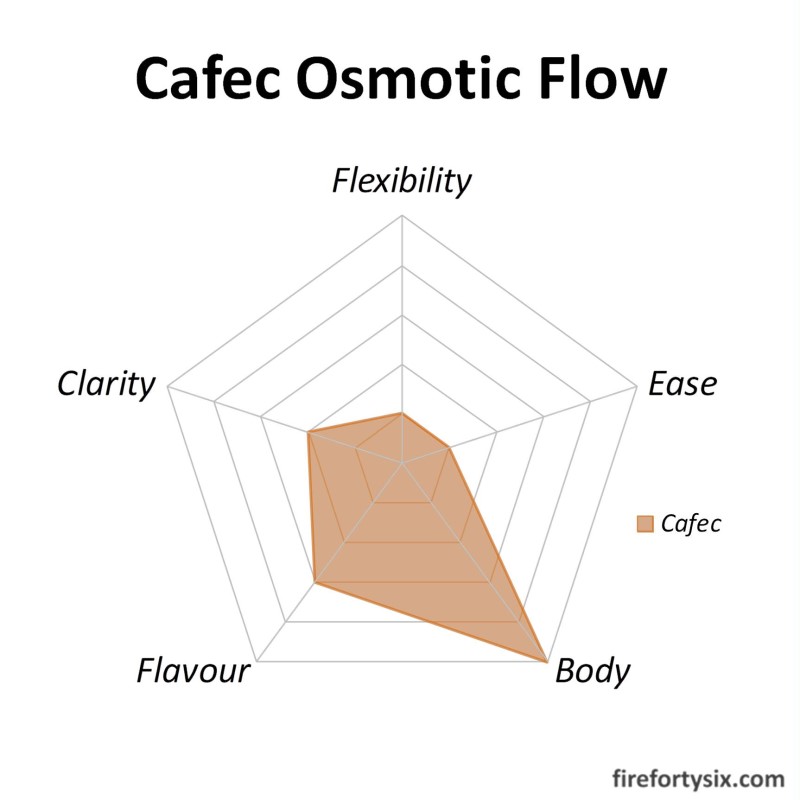
Despite my utter failure on the bubble side of things, I think I still managed to adhere to the principles of osmotic flow. The flavour of the cup was good with a very strong body, but with very low clarity and acidity. This is definitely the recipe I would use when I want a cup that packs a punch.
Onyx Coffee Lab
From the most difficult recipe to execute, I moved on to the other end of the spectrum with the easiest, as demonstrated by Elika Liftee from Onyx Coffee Lab.
He uses a coffee dosage of 15gm and 250gm of water, so I scaled it up proportionately for my 25gm dose. The grind size he recommends is medium fine, which is finer than the medium coarse size that I use for Tetsu, so I adjusted my grind accordingly.
The key brewing parameters, translated to my specific use case, were:
- Coffee: 25gm
- Water: 417gm (1:16.7 ratio)
- Grind Size: 3-3-0 (1Zpresso JX-Pro)
- Water Temp: 99°C
- Bloom: 83gm (3.3x coffee)
Again, here’s my short summary of the technique so that I don’t have to re-watch the entire 8:26 minute video the next time I use the recipe.
[Start]Bloom 3.3x(83gm)and gently stir with back of spoon to break clumps[At 0:30]Heavy pour with tight circles in middle, until 60% water(250gm)[At 1:30]Same heavy pour with tight circles in middle, until 100%water(417gm)- Water level should reach top of grounds after all water poured
- Valley should form after drawdown i.e. not flat bed
- Target for total brew time of
[2:30] - Although can vary widely from 2:00 to 3:30, depending on beans
- Taste for balance and adjust grind, if necessary
Compared to Tetsu 4-6 and Cafec Osmotic Flow, this recipe was super easy and also super fast. It was a less aggressive version of Tetsu’s “Only Bloom” technique, but left a similar valley-shaped coffee bed, though not as deep.
Figuring out and repeating the recipe was really easy, although there’s really nothing that can be tweaked. But that can be seen as an advantage, since it can be done consistently.
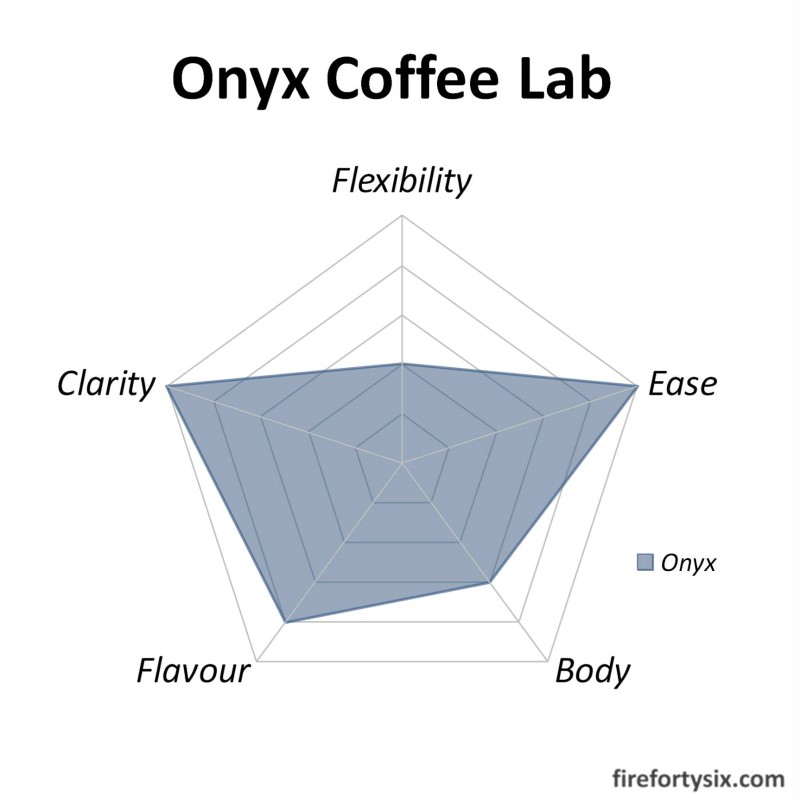
The cup that it produced was flavourful with very good clarity, though at the expense of some body and mouthfeel. I was pleasantly surprised with how good it turned out, and would definitely try it out on new beans.
Hoffmann Ultimate
You can’t do a comparison of V60 recipes without including Hoffmann’s self-appointed “Ultimate V60 Technique”. The name sounds grandiose, but his description and explanation is decidedly more low-key.
There are many similarities with the Onyx approach, especially the medium fine grind and just off-the-boil water. Both recipes ensure full bloom saturation, adopt a two-phase 60/40 pour and focus on high extraction rates.
My brewing parameters for the Hoffmann Ultimate were:
- Coffee: 25gm
- Water: 417gm (1:16.7 ratio)
- Grind Size: 3-3-0 (1Zpresso JX-Pro)
- Water Temp: 99°C
- Bloom: 50gm (2x coffee)
And my summary of the technique:
[Start]Create well in middle of grounds, bloom 2x(50gm)and swirl to saturate grounds fully[At 0:45]Fast circular pour, until 60% water(250gm)reached by[1:15]- V60 will be quite full when 60% water reached
[At 1:15]Continue with slower circular pour until 100% water(417gm)reached by[1:45]- Use spoon to stir one round, and another round in reverse direction
- During middle of drawdown, swirl V60 cone to achieve flat bed
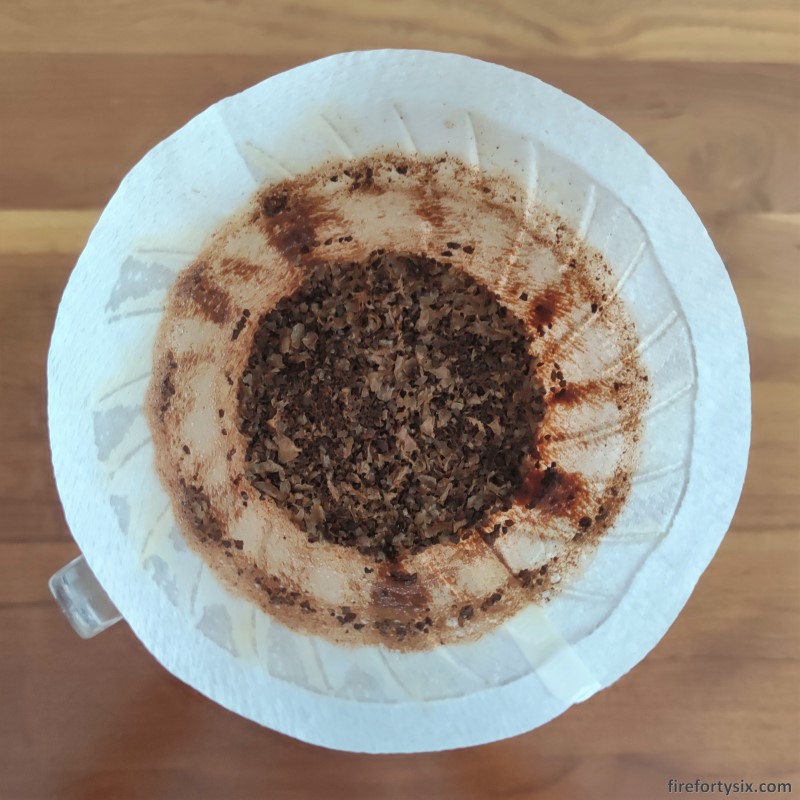
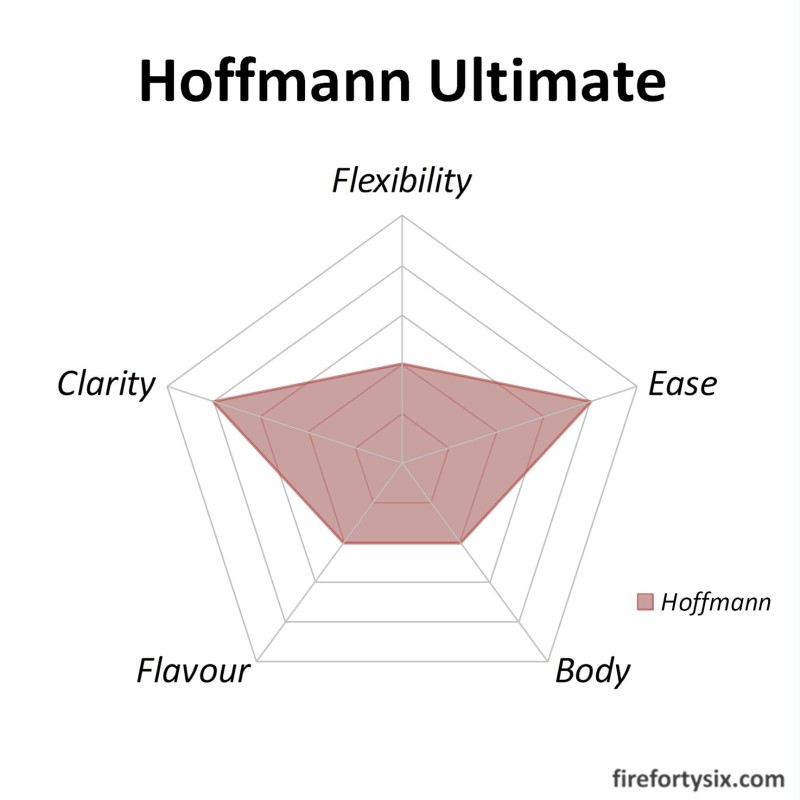
Hoffmann emphasises the importance of having a flat bed as it maximises extraction, and achieves this by swirling the V60. This move also seems to catch a fair amount of fines on the walls of the filter, resulting in this characteristically-looking brew bed.
Personally, I found the stirring and swirling a bit too fiddly, and prefer not to touch my V60 during brewing. While I get the idea behind having a flat brew bed, I’m not sure it’s really that important. It also makes the recipe less easy to execute.
I also wasn’t impressed with the taste of the brew, and found that it lacked flavour and body. The clarity was there, but it felt like a relatively weak cup of coffee for me. I felt that the Onyx method produced a better cup, using an easier technique with fewer moving parts.
Summary
Here’s how all four recipes stacked up against each other.
| Tetsu | Cafec | Onyx | Hoffmann | |
|---|---|---|---|---|
| Flexibility | 5 | 1 | 2 | 2 |
| Ease | 2 | 1 | 5 | 4 |
| Body | 4 | 5 | 3 | 2 |
| Flavour | 4 | 3 | 4 | 2 |
| Clarity | 3 | 2 | 5 | 4 |
As always, it’s easier to visualise the data in a non-tabular form, and the four-in-one radar plot below does a good job at highlighting the relative merits of each recipe.

Onyx was the easiest technique and produced a flavourful cup with the highest clarity. Even though I used my temperature-controlled gooseneck kettle to pour, it should be possible to execute it equally well using a normal electric kettle.
Cafec was the hardest to execute but resulted in coffee with the strongest body. A gooseneck kettle is mandatory to even attempt this recipe, given that a slow, steady and almost vertical stream is required throughout most of the pour.
Tetsu 4-6 Sweet x Strong produced a brew that tasted somewhere in the middle, with a good balance of both body and clarity. While harder to master, it offers a lot more flexibility in terms of tweaking the balance of sweetness, acidity and strength.
Hoffmann Ultimate was, for me, not the ultimate recipe. In fact, given the similar but less attractive flavour profile compared to the Onyx, I’d go with the latter if I wanted to brew a bright and clear cup.
Given my findings, I’m sticking with Tetsu 4-6 as my daily driver and will use Cafec or Onyx when I’m in the mood for a particularly strong or bright cup. It might even be possible to replicate the Onyx flavour profile using another Tetsu 4-6 variant, but that’s another experiment for another day.
